Friday, October 23, 2015
Tuesday, October 20, 2015
hello!
the Victorian Christmas cards/projects are just about ready!
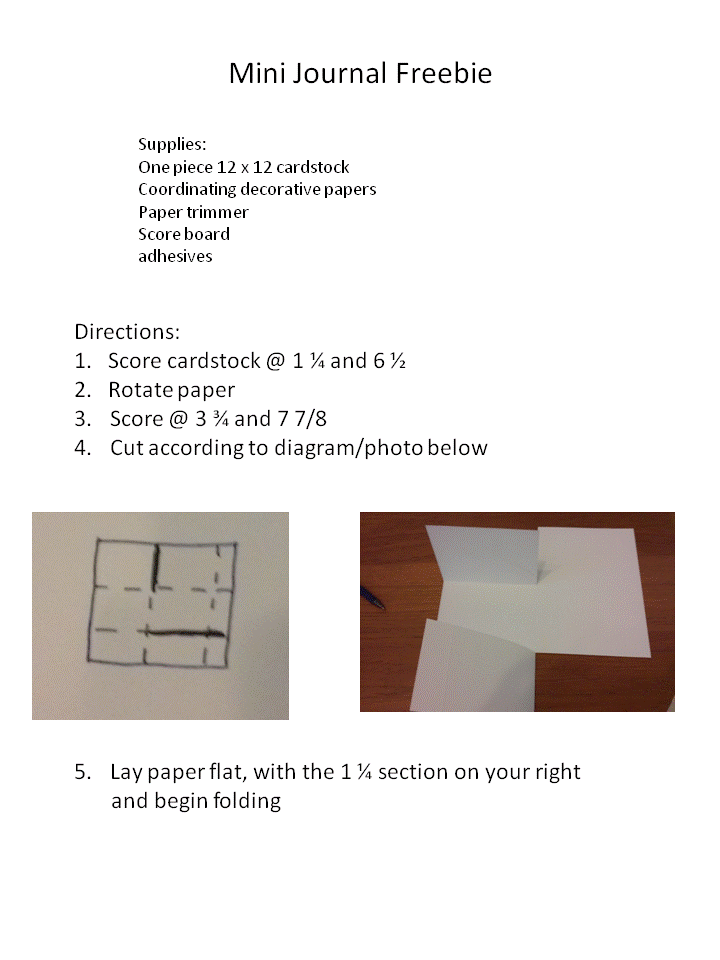
But in the meantime, get ready for a mini journal tutorial here.
Gather your supplies:
one piece 12 x 12 card stock
coordinating paper scraps
a few mini brads
one piece 12 x 12 cream card stock
Often times we think we are too busy to commit to a daily activity. I know I do and that has stopped me from trying new things/ideas. So I challenge myself and you to this mini journal project.
I also think there will be several people I know that are going to be together sometime this weekend, scrapping, stamping, sharing.......maybe you can set aside one hour (or less) and make this journal together.
Just a thought........
And, you may be home, in the midst of several PHD's and dread the thought of starting one more.
Give it a try, it might be the push you need....
enough said, watch for the tutorial later this week
and thanks for stopping by.
margie
But in the meantime, get ready for a mini journal tutorial here.
Gather your supplies:
one piece 12 x 12 card stock
coordinating paper scraps
a few mini brads
one piece 12 x 12 cream card stock
Often times we think we are too busy to commit to a daily activity. I know I do and that has stopped me from trying new things/ideas. So I challenge myself and you to this mini journal project.
I also think there will be several people I know that are going to be together sometime this weekend, scrapping, stamping, sharing.......maybe you can set aside one hour (or less) and make this journal together.
Just a thought........
And, you may be home, in the midst of several PHD's and dread the thought of starting one more.
Give it a try, it might be the push you need....
enough said, watch for the tutorial later this week
and thanks for stopping by.
margie
![]() |
| the picture says it all! |
Thursday, October 15, 2015
for your viewing pleasure.......
And there's more.........
Hope I sparked an interest. Watch for more information,coming soon.
It's time for me to clean up!
margie
Tuesday, October 13, 2015
Victorian Christmas time
Get ready for some cards that pop up, pop out, pull out........
Mailable cards, hand delivered cards...........
Countdown journals, ornaments.........
What is needed you ask? A few pieces of everyday cardstock, adhesives, embroidery floss and these
The Prima Victorian Christmas collection including the A4 paper pad, journal cards and wood embellisments.
A preview.......
Get your supplies ready. Tutorials will be available within the next week. Buy them all, buy just what you want. Make them all and you will still have enough paper to make multiples of my favorites. After all this I have at least 3 of each paper design, extra wood embellishments and journal cards or for!
Mailable cards, hand delivered cards...........
Countdown journals, ornaments.........
What is needed you ask? A few pieces of everyday cardstock, adhesives, embroidery floss and these
The Prima Victorian Christmas collection including the A4 paper pad, journal cards and wood embellisments.
A preview.......
![]() |
| 4 mail-able cards |
![]() |
| Countdown journal and mini ornament |
![]() |
| 4 hand delivered specialty cards that will wow the recipient - think dimensional! |
Get your supplies ready. Tutorials will be available within the next week. Buy them all, buy just what you want. Make them all and you will still have enough paper to make multiples of my favorites. After all this I have at least 3 of each paper design, extra wood embellishments and journal cards or for!
margie
Thursday, October 8, 2015
coming to an end......
this is a sad day for me, really.
Here are the December GR 45 Time to Flourish Cards
I will be sending the directions out this weekend.
This series was so much fun and it was a wonderful way to stay in touch with all of you.
I hope it isn't the end of our contact........
Watch for the tutorial in your email soon.
thanks so much for your support.
margie
Sunday, October 4, 2015
a first
we have been here almost a year now and finally ventured out to have our first real mexican food.
We both ordered the small ($3) burritos. They go up to $9 and that one is huge!!
Jeff ordered the Carne Asada (grilled steak) and I ordered the beans and cheese.
Then we picked 3 more fillers (free!).
My mouth is still feeling warm from the homemade sauce but it was delicious.
We are already making our next order.
Tania's is less than 2 miles away and you can order on-line. We waited less than 15 minutes for our order. We watched the tortilla maker in the kitchen.
Never judge a restaurant by the building. They've been in Tucson for over 40 years and at the present location for 30 years. Family owned and run. Tania's dad opened the place. Her mom takes orders, and busses the tables. It was packed, too. All 6 tables, like a cafeteria - long, lots of chairs, you really don't sit at your own table. And only 5 parking spots! People walk or park in a larger parking lot and walk. You know the food must be good if "locals" park and walk in triple digit heat!
We both ordered the small ($3) burritos. They go up to $9 and that one is huge!!
Jeff ordered the Carne Asada (grilled steak) and I ordered the beans and cheese.
Then we picked 3 more fillers (free!).
My mouth is still feeling warm from the homemade sauce but it was delicious.
We are already making our next order.
Tania's is less than 2 miles away and you can order on-line. We waited less than 15 minutes for our order. We watched the tortilla maker in the kitchen.
Never judge a restaurant by the building. They've been in Tucson for over 40 years and at the present location for 30 years. Family owned and run. Tania's dad opened the place. Her mom takes orders, and busses the tables. It was packed, too. All 6 tables, like a cafeteria - long, lots of chairs, you really don't sit at your own table. And only 5 parking spots! People walk or park in a larger parking lot and walk. You know the food must be good if "locals" park and walk in triple digit heat!
Saturday, October 3, 2015
world card making day!
it happened again........
and here are the results......
![]() |
| die cut word from same paper leaves came from lace and seam binding bow some mini sequins |
![]() |
| loved the faux batik so I just layered it with black to make it pop and added one of my favorite word stamps. |
there's more!
the finished cards are coming!
I wanted you to see the process first. And there will be more ideas, too.
Go Green!
I wanted you to see the process first. And there will be more ideas, too.
Go Green!
samples
some ideas to try one day.......you may have tried them ........never hesitate to try them again.......
clear embossing paste through a stencil - I used Wendi Vecchi's but any will work.
let dry
spray with water and color with your favorite choice. I use colored pencils (I took the paint from the pencil tip, using a water brush) and a color spray.
crumble it up - you want it to crack
add inks all over, rub good you want it to get in the cracks and wrinkles.
create a soft background with distress inks and set aside.
create another piece using Tim Holtz' wrinkle free distress method ( smooth ink onto mat, spray water, mist card stock - watercolor paper, mixed media paper or another strong kind) and swish through the inks, drying between swishes) you can check out his method on his blog.
I also added some pewter distress stains to my die cuts for a subtle shine.
Okay that's it for now. I have some Spartan football to watch. The game starts at 9am. (there is truly something wrong with that!) I will be back after the game.
have fun and create. Remember it's only paper!!!!
margie
clear embossing paste through a stencil - I used Wendi Vecchi's but any will work.
let dry
spray with water and color with your favorite choice. I use colored pencils (I took the paint from the pencil tip, using a water brush) and a color spray.
I dried it between applications.
faux batik: clear emboss
add inks all over, rub good you want it to get in the cracks and wrinkles.
optional but I like it a lot - iron the embossing ink off: I use a hot iron and a paper bag. This also flattens the card. I also used very vibrant colors, as you can see.
create another piece using Tim Holtz' wrinkle free distress method ( smooth ink onto mat, spray water, mist card stock - watercolor paper, mixed media paper or another strong kind) and swish through the inks, drying between swishes) you can check out his method on his blog.
die cut your design from the second piece and add it to your background piece after doing some random stamping, if you want.
Okay that's it for now. I have some Spartan football to watch. The game starts at 9am. (there is truly something wrong with that!) I will be back after the game.
have fun and create. Remember it's only paper!!!!
margie
Thursday, October 1, 2015
October National Card Making Day
Get ready for some fun cards on Saturday. I will have some samples and some directions for you to play with during National Card Making Day.
Check back then!!
margie
Check back then!!
margie
Subscribe to:
Posts (Atom)